2.28.2013

DIY Cake Stands -- Part 1

I'd like to preface this post with the fact that this should not be a two part-er...however, it was so cold last night and I was so tired that I couldn't finish this project.  And since I had teased about it yesterday, I didn't want to leave anyone in suspense as I'm trying to get better with my commitment to blogging again so here we go! 

After I finished making about five more tissue balls last night, hung them, decorated my ceilings, and made dinner for my family, I ran out to the garage to work on these DIY Cake Stands.  I got the tutorial from Kate at Centsational Girl which you may have seen on my post last week of all the DIY's I want to accomplish this year. 

It's super easy.  All you need is:

*Cute Glasses & Old Plates -- I got mine at Goodwill for under $5 for all
*Frosting Spray Paint
*Colored Spray Paint
*Household Silicone Sealant

Here are my soon to be beauties...


I apologize for the beautiful background here... our garage is a HOT MESS --- Like hotter than hot and there was not much room to work on our work table because the roof shingles for the dollhouse were still drying... nothing like waiting until the last minute!  Procrastination Station! 

So first start out by flipping your plates over... and your setting your glasses, centered on top of them.
It should look similar to this.


Then it's time to frost. 
I didn't take a picture of this because you could barely tell the difference, but this is what helps the paint stick!


Let that dry -- Takes about 10 min or so...
I gave mine longer so I could work on a few things inside while they were drying.

 Then it's time to paint them.  I picked out shabby pink and shabby green to work into the party's theme of Shabby Chic Tea at the Dollhouse!  I think it's coming out better now!  haha...


And you should get something like these...


Can I say how in love I am with them already and they aren't even finished?


So tonight I will be finishing them up and posting here tomorrow! 

xoxo,


Reminders:


*TODAY is the last day to shop for my Go Red Fundraiser -- I'm still wearing my Red Leather Wrap. Hoping to send a check of at least $50... :) So get your shop on!

*TODAY is also the last day to enter the giveaway for the Izzy Little Girls Set or at $25 Stella & Dot gift card -- super easy ways to enter! Don't forget! So far only 1 person is entered -- It's looking good for them!

*I challenged my husband to host a Stella & Dot show -- THE MAN SHOW -- and to get 5 orders by TODAY as well -- are you sensing a theme here? But in return he will get to go to his SUPER HUGE, SUPER EXPENSIVE coaching clinic in June! Wish him luck or help him out here.


Linking Up Here Today!

2.27.2013

DIY Napkin Pom Poms for FREE

With E's birthday party coming up, I'm tackling a project just about every night.

And with the budget being extremely tight these days, I was grasping at straws for decor ideas that were on the cheap!  So when I came across a huge set of pink dessert napkins I thought they could surely be used for something! 

So... Here's what I did:

I read somewhere that about 10 sheets of paper were good for the poms so I unfolded 10 napkins and laid them out on the floor -- Sorry for the carpet background!


Then I folded them accordion style until I ran out of napkin to fold. 
Most of the directions I found said to use floral wire in the middle but I couldn't find mine so I used the twine I had on hand. 

The theme is Shabby Chic Dollhouse Tea Party -- confused much?!? 
It started as a Doll/Dollhouse theme, but really it's just because there's a dollhouse so we got a little confused in the middle...

Then you just start to pull apart the layers. 


Mine are not perfect by any means, but they worked for $0.0 and will hang just like any other pom from the ceiling. 


Can't wait to get them all up! 
I made 6 pink poms these sizes, 3 large white poms, and 2 teal different kinds I bought at the Dollar Store in their Easter decor section.

I'm getting excited! 

And tomorrow I'll be sharing my DIY cake stand experience!  We shall see how that goes...

Reminders:
*Tomorrow is the last day to shop for my Go Red Fundraiser -- I'm still wearing my Red Leather Wrap.  Hoping to send a check of at least $50... :)

*Tomorrow is also the last day to enter the giveaway for the Izzy Little Girls Set or at $25 Stella & Dot gift card -- super easy ways to enter!  Don't forget!  So far only 1 person is entered -- It's looking good for them! 

*I challenged my husband to host a Stella & Dot show and to get 5 orders by tomorrow as well -- are you sensing a theme here?  But in return he will get to go to his SUPER HUGE, SUPER EXPENSIVE coaching clinic in June if he does!  Wish him luck or help him out here.

Happy Hump Day!

 xoxo,


Linking up over at Home Stories A to Z today!

Home Stories A2Z

2.26.2013

Please help & a Giveaway!

Good Morning Bloggettes! 
(Why is the initial auto correct for Bloggettes, Baugettes?  heh.)

I'm looking for a good name for my followers... I'm hoping to catch a few more people here in the next coming weeks... So many things to share...
I know, I always say that, but seriously!  So many!

Anyways, I need to ask for your help!  I've recently promoted in Stella & Dot to Lead Stylist and in order to qualify and retain that title I am in need of a few more orders and Style Sessions (trunk shows)- online or in home - for this month!  I am not usually one to ask for help -- ask my parents, my grandparents, and my friends -- but in this case, I'm willing to swallow my pride and ask... because honestly, I really want to keep this promotion that I worked so hard for!  I'm sure you can relate to that in some way!  You might be able to, you might not... I understand! 

If you currently have any items on your wish list, please consider ordering now!  If you email me your order, I will take care of the shipping for you! 

In order to qualify for my title this month, like I said, I need a few more orders... few being 5... by the 28th.  I would much appreciate your help in this matter!  Again, I can't believe I'm doing this, but I am...

ALSO --
Because I love you all so much and appreciate your continued following and support, I'm offering a giveaway(see below for details)

Up for grabs -- Because it's E's Birthday party this weekend -- I will be giving away a
Little Girls Izzy Necklace & Bracelet Set.


or a
$25 Stella & Dot Gift Card 


Your choice!

Here are the rules:

First Entry -- Visit www.stelladot.com/abbyk and comment below with your favorite piece!

Additional Entries --
 Follow Me on Facebook and Comment that you are new! www.facebook.com/sdabbyk
1 Entry

Request to follow me on Instagram -- SDAbbyK
1 Entry

 Follow me on Twitter - @abbykellermeyer
1 Entry

Share this on your blog, twitter, facebook, etc!
2 Entries

Place an order at www.stelladot.com/abbyk and for every $25 you spend you will get an additional 1 entry! 
*** Orders placed by Feb 28th will also receive
a little something special from me as a token of my appreciation***

This giveaway will be ending Feb 28th
Winners will be selected


xoxo,

Again, thank you so much for your continued following and support of my small business!

2.25.2013

Doll House Update - Interior

Time for the rest of the doll house update.  First, I'd like to explain that the doll house MUST be done by this weekend (or at least presentable) because of E's party.  It's part of the decor of the day.  Second, here is the picture I was looking for of the exterior.  Here's what we started with:
Exterior:

Interior:

And here is what we've done with the place. 
The only things I bought for this dollhouse were scrapbook papers for the wallpaper. 
This is not a professionally done dollhouse I'd like to remind you. 


But it does look like a-whole-nother house!
Here are the rooms labeled. 


Please note that since this picture above, I've painted chalk board paint above the music notes. 

Kitchen:
Just a couple hiccups...


Master Bedroom:
I kinda wish this were my room.

Upstairs Hall:
I love this area.  I love the writing on the walls...

Living Room:
Used leftover paint from our hallway. 


Playroom:
Love this... wants to make me polka dot a room!

What do you think?  It was so easy, but VERY time consuming. 
But it was fun and yes, I want to play with it everyday!
So I can't wait until E is really old enough to sit and play!  I'll be right there with her!  :)

Now onto the few finishes and painting some of the furniture.
xoxo,


Linked up with

 Somewhat Simple


2.21.2013

Doll House Update - Exterior

You may remember when I made a big purchase probably about a year ago this past fall...
My big Doll House Purchase.

It was from one of my favorite online auction sites -- shopgoodwill.com --  and it was for Baby Kakes.

Well the time had come and gone to redo it -- that time while I was still pregnant without a toddler running around in my life -- almost seems like a far off memory now...

And I've been working on it for E's first birthday present.  I swear her birthday has turned into a month long celebration... lucky kiddo!  It's probably more of a problem on my end because I'm always like E needs this or E needs that.  Ooops!  That's going to stop soon! 

But here's what we started with...

It was Barnyard Red.  It was a cute little house... red with green shutters.  I liked it... I mean, I bought it, right?  But I couldn't see those colors in E's room. 

So we laid it out in the garage -- Please excuse the mess.
And I'll search through my archives because I know I have a full frontal pic to share!


Sprayed on some paint remover -- Might be one of my new favorite items!


Look how easy the paint comes off...


And Voila!  It's all gone!  This color was GORGEOUS once sanded... I could have left it like that.


But I didn't like how it was different on all sides...


But look how cute the front looks...
It almost looks like old worn bricks...
L. O. V. E.
And E being my little helper.


Isn't she the cutest? 
She's such a big girl now.
Below might be one of my favorite pics EVER of her.


But with all the outside paint removed we sanded and were ready to paint. 

But what color?  I'm too cheap right now to go out and buy paint and I have a ton of paint in my garage just sitting... waiting.. wishing it will be the next to be used.


So I found these samples and decided to test them out and see what they might look like.
I dipped old shingles in each and let them dry.
Again... I am cheapo right now.


I also took the shingles and swiped them on the 2 pieces I had taken off of the room...
Which reminds me they need to go back.


And we had a clear winner.
The perfect color for a little baby girl.
The perfect color for a whimsy room and a delicate look.
The lavender won out... It's actual name is Silver Linings -- I feel like this house might be called that at at some point.


We decided on Silver Linings with white trim and black shutters... 
Love.  I had some white laying around from trim and the shutters are actually chalkboard paint I had leftover as well.  My garage is a supply room of misc items!  


So here we are.  The outside is getting there.
It's not perfect by any means, but it's looking much better compared to the beginnings. 

And now onto the inside... here's a sneak peek of what's to come!  It seriously is looking GREAT!


Just a few things left to finish and then to use it for our big party next weekend!  Yay!

Still to do:
Singles
Fix windows
Paint Stairs
Fix up minimal furniture that we do have
Add wheels?  For easier movements?  Jury is still out on this one!

And don't forget about my American Heart Association Fundraiser -- Check it out here.

xoxo,


Linking Up over at Somewhat Simple today

Somewhat Simple

2.20.2013

Loss... What's on my Mind

Today I'd just like to reflect...

Please hug and kiss your loved ones as much as you can...
Tell your parents you love them every time you hang up...

We never know what God has in store for us and sometimes life is too short. 
It's so unreal how quickly your life can change...

Keeping our friend and her family in our thoughts and prayers today as they mourn the loss of a brother, son, husband and father. 

xoxo,


When you are sorrowful look again in your heart, and you shall see that in truth you are weeping for that which has been your delight. ~Kahlil Gibran


2.19.2013

Attempted DIYs for 2013

I'm filling my calendar with parties, projects, and just plain anything that will keep me busy!  Baby Kakes & Mr K are in there somewhere too!  In between the Jewelry Parties, Birthday Parties, and Hockey Tournaments, I will find time to do the below projects! 

I think the key to keeping myself on track is keeping myself busy!  So with that said, here are the below projects I will tackle and share with you!  Don't judge that most of the tutorials listed are from 2 places -- Kate, I swear is a long lost friend I've never met and Sherry is just plain awesome! 

February
Dessert Stands

cg pink orange dessert stands
via

First of all I will probably be attempting these sometime soon!  I believe they might (1) be necessary for Baby Kake's Birthday Bash and (2) they would look lovely on top of my cabinets as decoration... in the right colors...

March
Framed Ferns

fern art on wall cg
via

I've always loved this idea, but never really known how to do it other than printing out a fern print... and here she be!  A great easy DIY on how to actually frame REAL ferns!  I love it... the only thing I wonder about is their ability to last.  Guess we shall see... And I need to figure out a place they could go. Hmmm...

March
Sisal Rope Bowl


rope bowl by kate
via

This is a must do!  It looks easy, although I'm sure my attempts will be crooked or my glue always seems to get the best of me.  I do think this would be a nice accent in a couple of places AND I've seen it done and would love to try on a laundry basket. 

March
Faux Bois Vases


winter white faux bois vases cg
via
 I've attempted hot glue on glass before and did not have GREAT results... they were OK, and my mother still loves the one vase I attempted, but I was 8.5 months pregnant at the time so I'll give myself another chance.  Plus, I love the fact that they painted these after.  Perfect for mantles (of which I do not have).

April
No Sew Napkin Pillow Covers

supplies

These I will probably just attempt to make with all the fabric I have accumulated all over my house... I've done them before, but mine looked floppy... a floppy that I like, but new attempts with new instructions might make for better cases! 

March/April
Organizing Garage

via

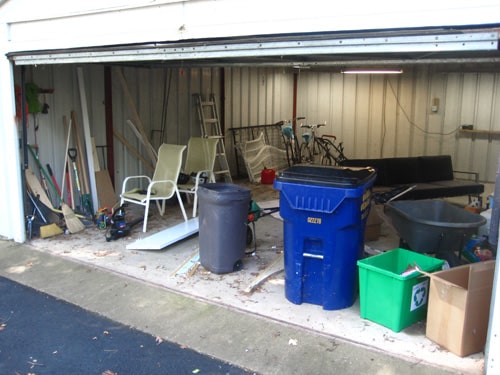
Imagine this 3x worse... Our garage is a combination of storage, DIY hoarders, Hockey Hoarders, and Trash.. yes, I said it... trash. There is absolutely no rhyme or reason to our garage... we need help! Once it gets nice, I'm going to tackle this. I will look for cabinets, shelving, organizational keys, anything and everything to help!

April/May
Paint Kitchen Cabinets

I think this one I might tackle with the Rustoleum packages that they sell now... I can do my bathrooms first and see how it goes -- I'm thinking this is the best way for us...

May/June
Landscaping

This is happening this summer... we might tackle some issue spots, move some things around, and just overall beautify the landscaping of our home... Our bricks will get a face lift and we need to figure out something for the side of our house.  BHG has some great landscaping plans, ideas, and tips... This is all on me and my green thumb (only for outdoor plants... I recently killed a cactus inside). 

I think by spreading these out, I will accomplish them more easily... We shall see...
Starting small and working my way to the big projects. 

Wish me luck!

xoxo,
Related Posts Plugin for WordPress, Blogger...